
In this article, you will find payroll module settings from entering employee data to paying out salaries.
● Note: check the Payroll settings used in the software. The accounting accounts used – Menu Settings → Automatic operations → Payroll. Also tax and accrual settings – Menu Settings → Payroll settings. ● Entering employee information (employment contract, salary, taxes)Go to the menu Payroll → Employees → click “+ New employee” (on the right side of the screen, at the top).
1. In the window that opens, fill in the employee’s details. Fields marked with an asterisk (*) are mandatory.
2. Make sure to correctly indicate the start date of the employment contract, and if the contract is fixed-term, also the end date.
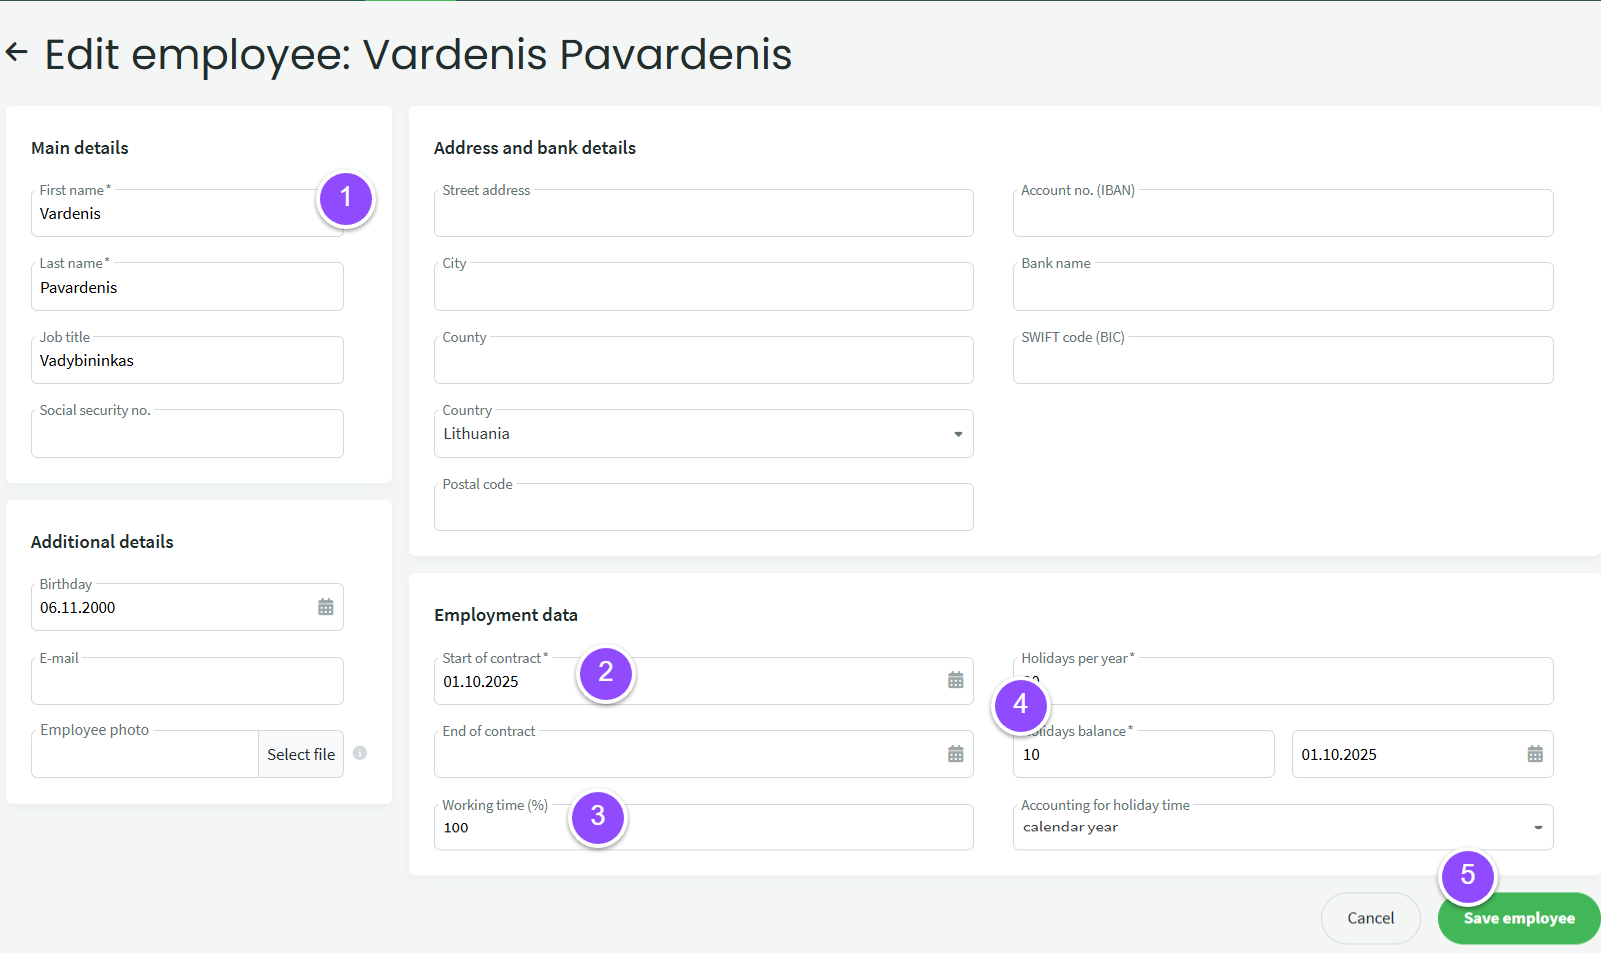
3. In the field Working time (%), indicate the percentage of time the employee works. For example, if the employee works a standard 8-hour workday – select 100%. If the employee works only half-time (4 working hours), select 50%; if 4 days per week – 80%, and so on.
4. In the field Annual leave per year, enter how many days of leave the employee is entitled to per year (usually 20 working days). Leave days balance – fill this in if the employee has previously worked at the company and has accumulated unused leave. In the date field next to it, indicate the date when the leave balance is recorded (usually the same as the employment contract date). For Leave time accounting, leave the option “calendar year”.
5. Save the information.
After saving the information, you will be redirected to the employee card. Next, specify the employee’s salary – click “Add new salary”.
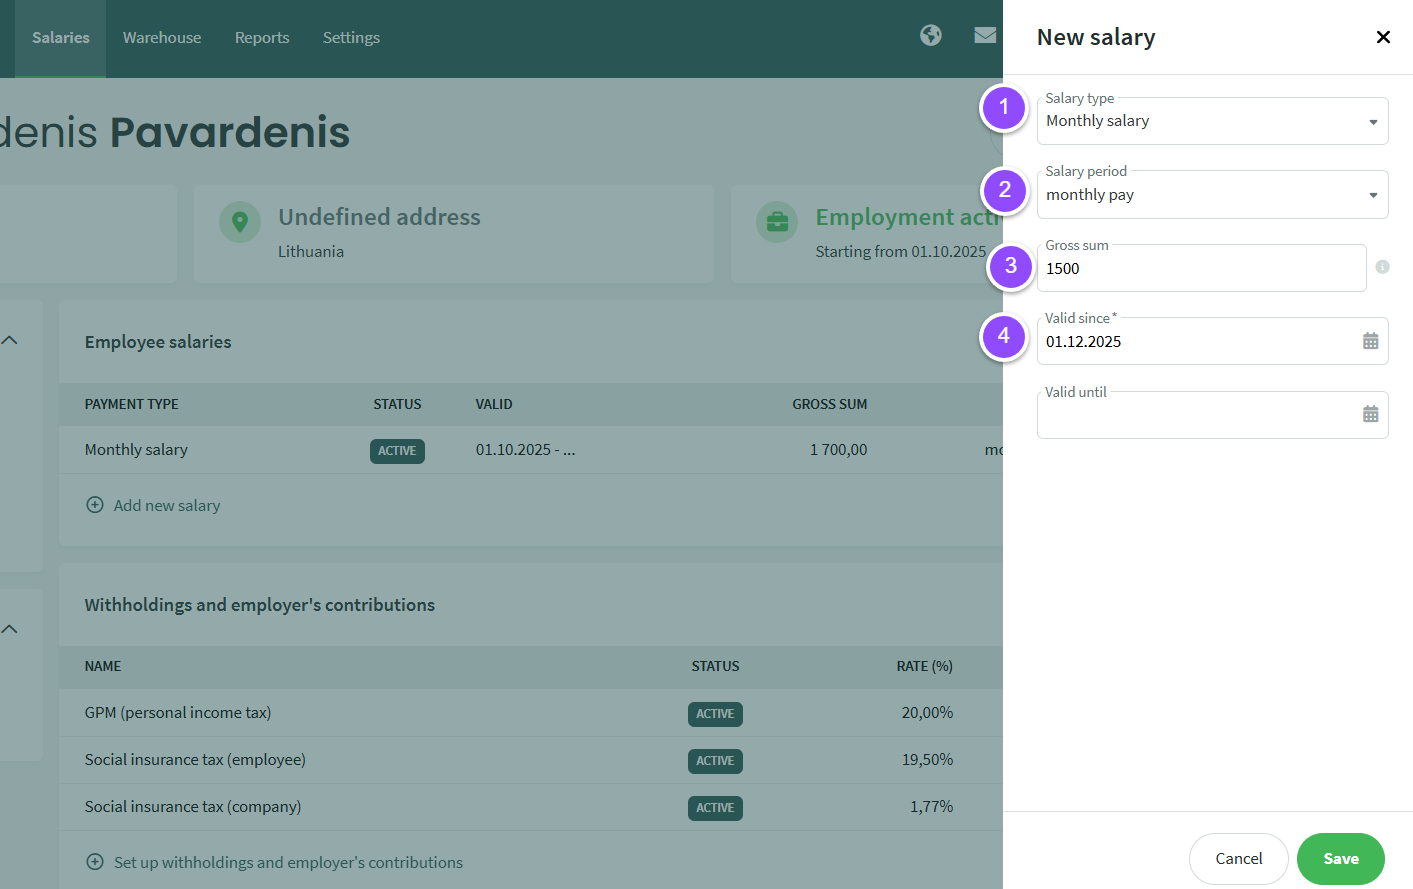
In the window that opens, specify: (1) the type of salary (most commonly a monthly salary), (2) the salary period, (3) enter the gross amount “On paper”, before taxes, and (4) from which date the salary is valid (usually matches the employment start date). Save the data.
Next, enter the withheld taxes. In the employee card, click “Set withheld taxes and employer contributions” and in the window that opens, mark which taxes (1) are withheld.
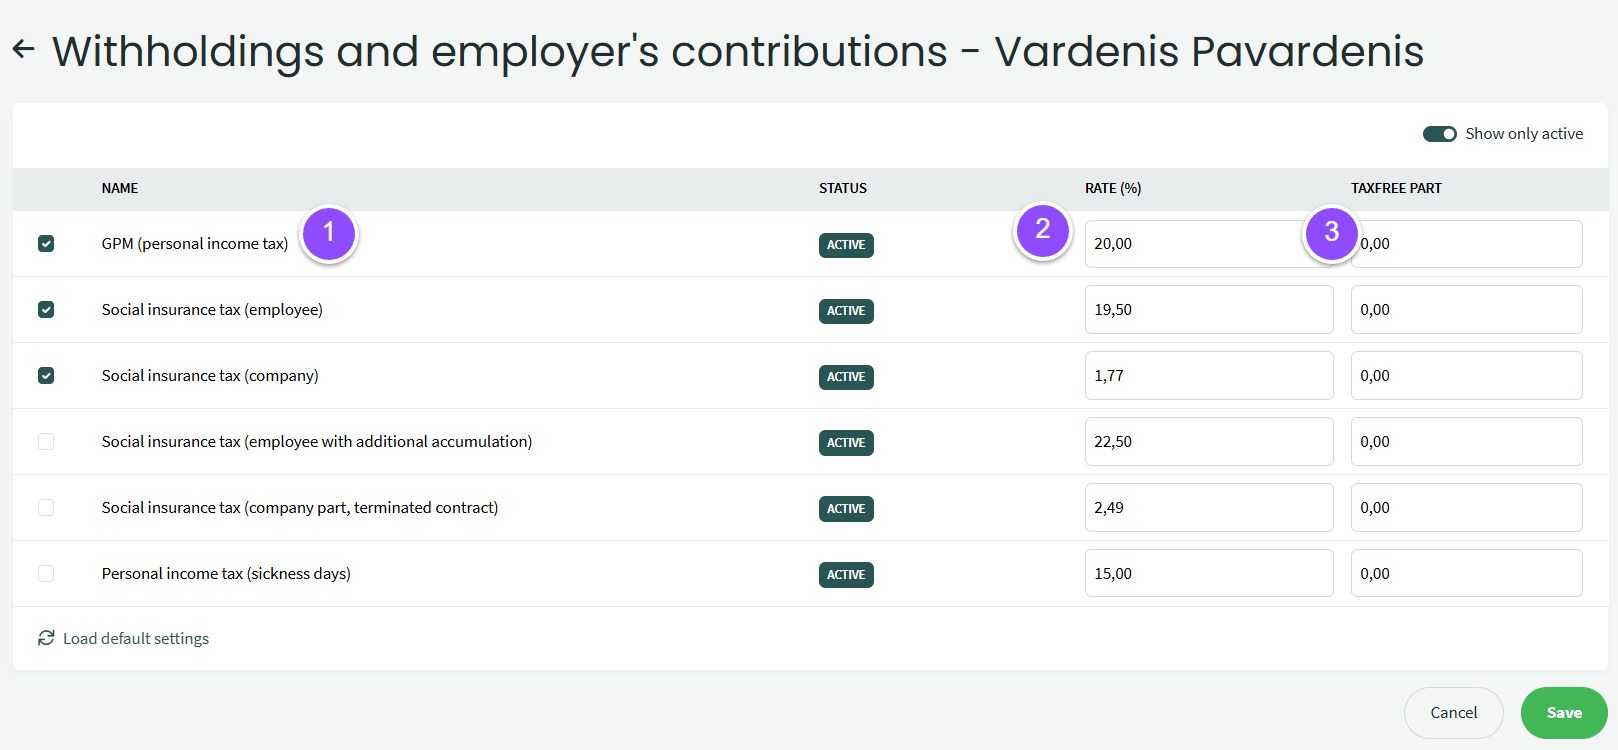
For example, if the employee works under an open-ended contract and contributes additionally to a pension, (1) check GPM, Sodra employee with additional contributions, and Sodra company. If you want to specify a rate different from the suggested one (2), you can adjust it here. If the employee applies NPD (non-taxable income amount), in field (3) you can enter the non-taxable amount. The size depends on the employee’s salary: if the employee earns minimum wage, enter the maximum NPD amount; if the salary is higher, enter a proportionally smaller amount. You can check the NPD calculator on the VMI website. The NPD amount can be entered/adjusted with each payroll calculation. Save the data.
● Calendar. After entering the information above, you can proceed with payroll calculations. But first, make sure the calendar (timesheet) is filled in correctly. Menu Payroll – Calendar.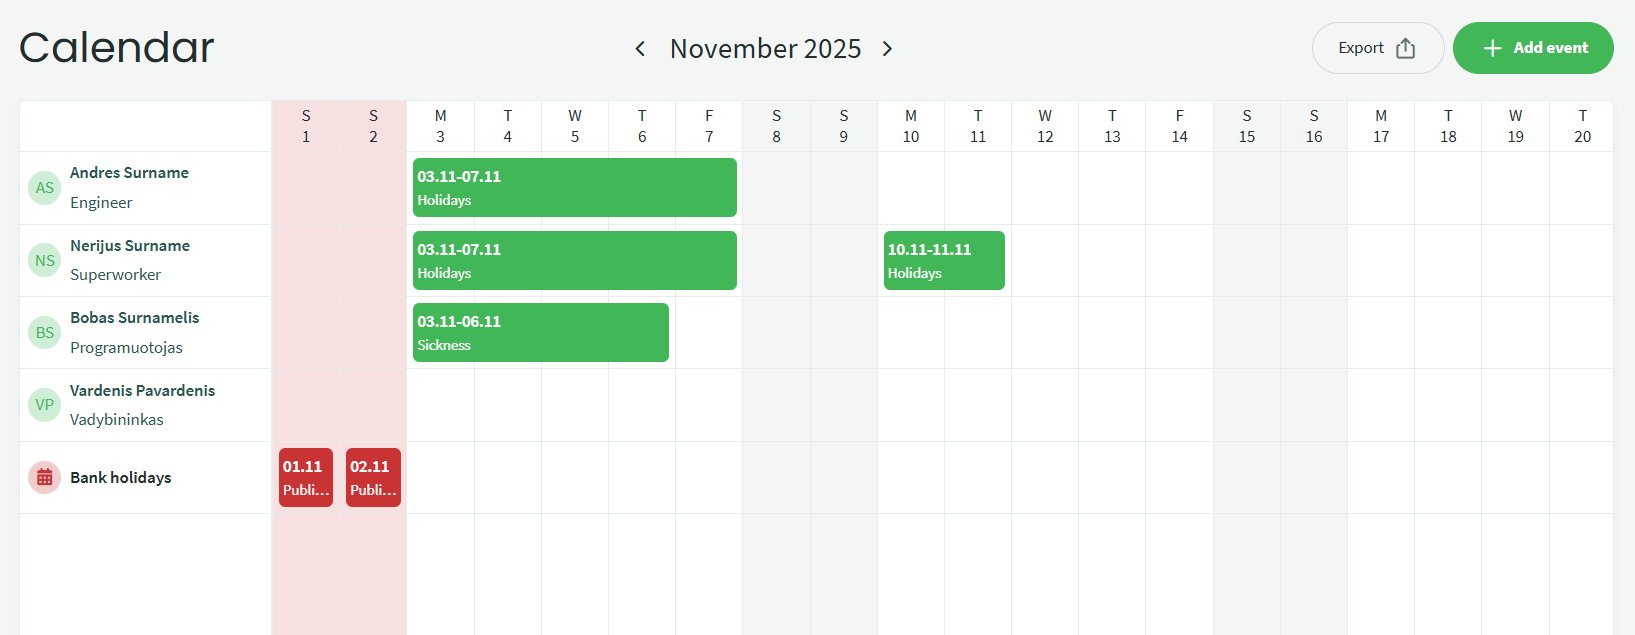
If the employee works a regular work month, nothing additional needs to be indicated in the calendar. Only atypical working/rest time is entered in the timesheet, for example when the employee is on vacation, sick, absent from work, etc.
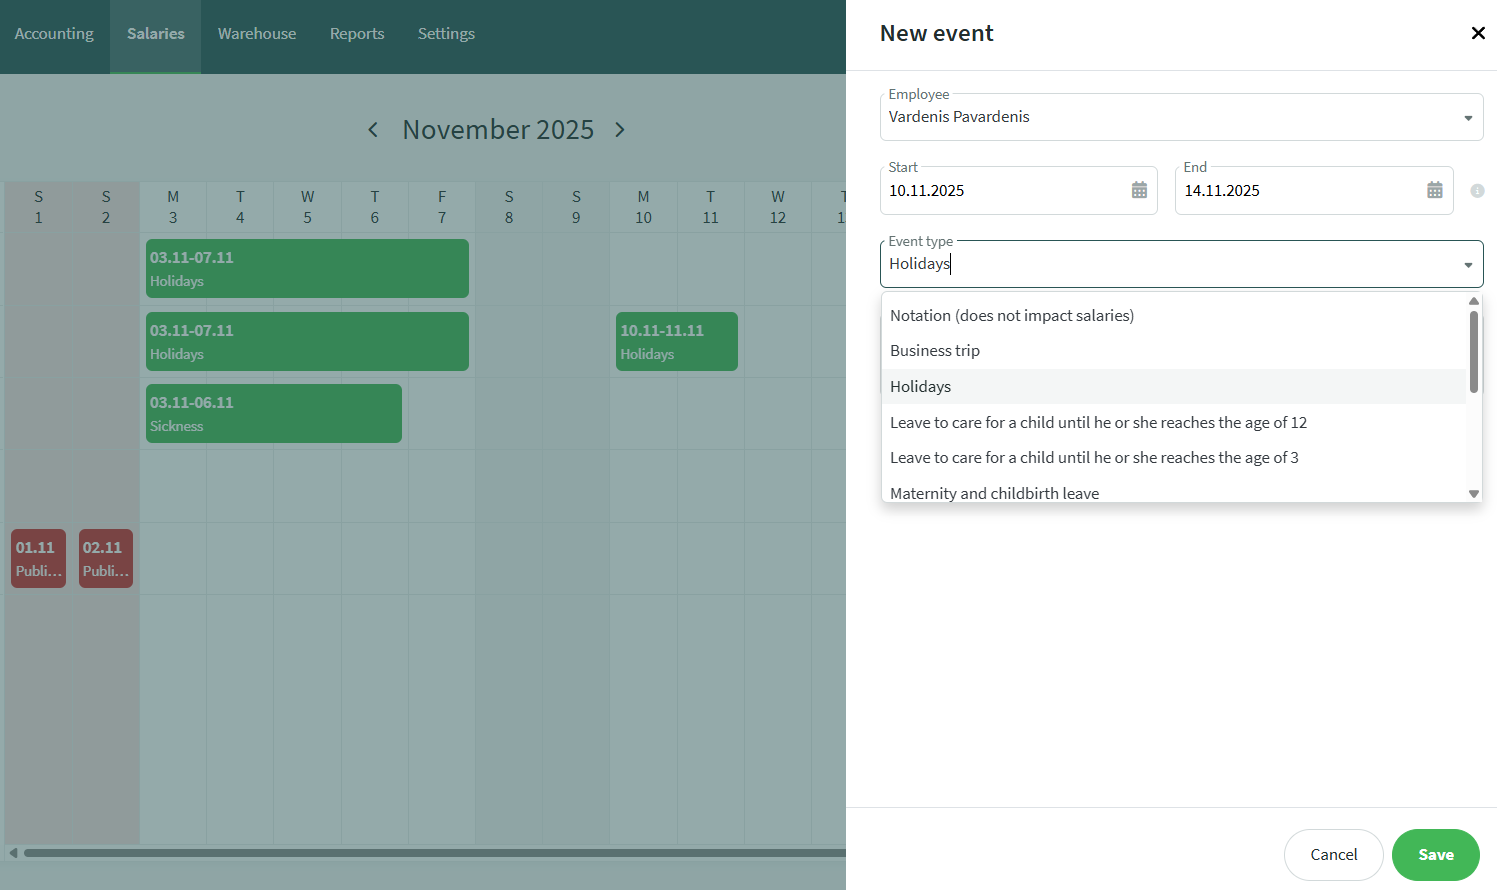
If you want to enter a type of working time, click +Add event or click directly on the chosen employee’s day. In the window that opens, specify the dates and select the event type. Public holidays are filled in automatically in the calendar, but if you want to add one manually, click on the desired day and select “Holiday”, then enter the information.
● Payroll calculation (salary)Menu Payroll – Salaries.
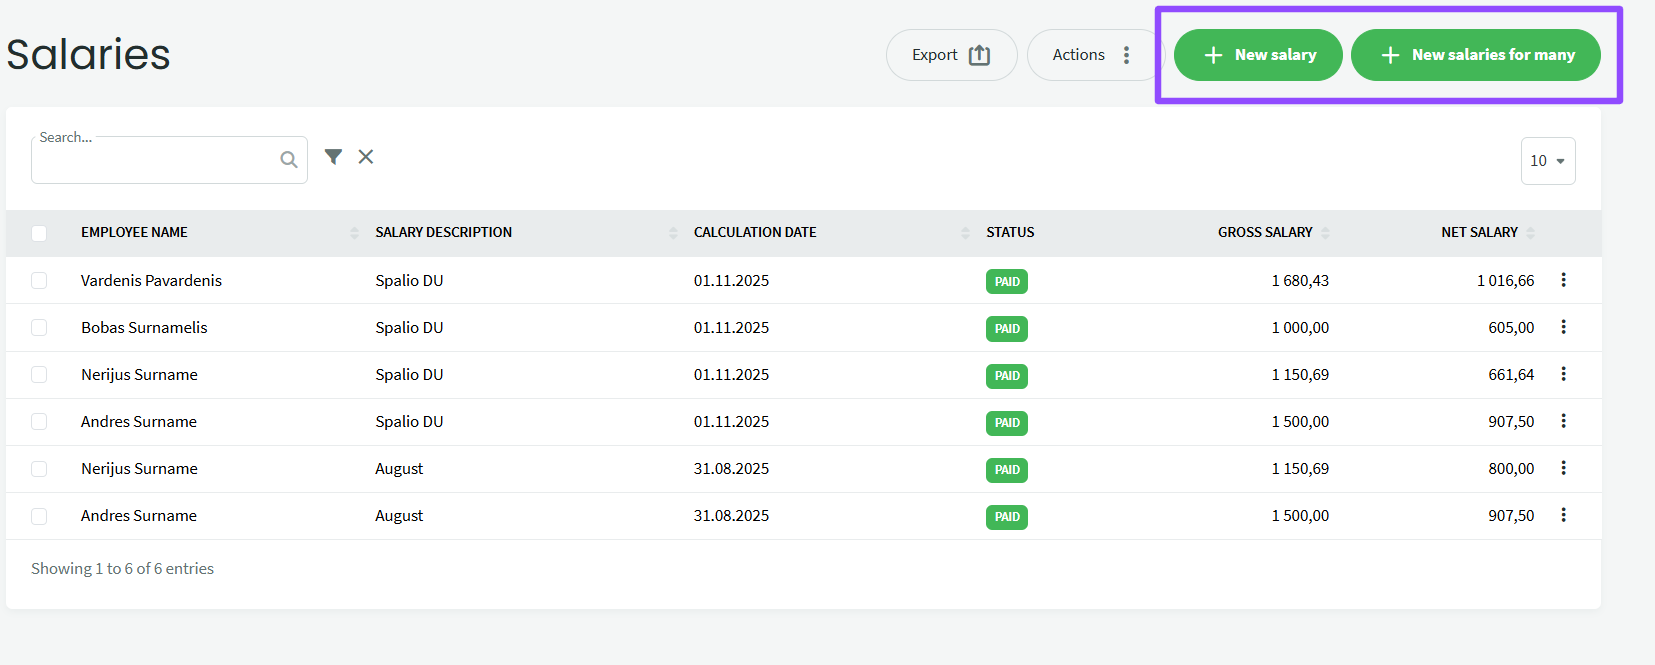
To calculate payroll, select +New salaries for many (for all employees at once). If you want to calculate salary for a single employee or view/edit detailed calculation data, choose +New payroll – this will open the payroll calculation window for one employee. Click +New salaries for many and in the window that opens, fill in the fields marked with an asterisk.
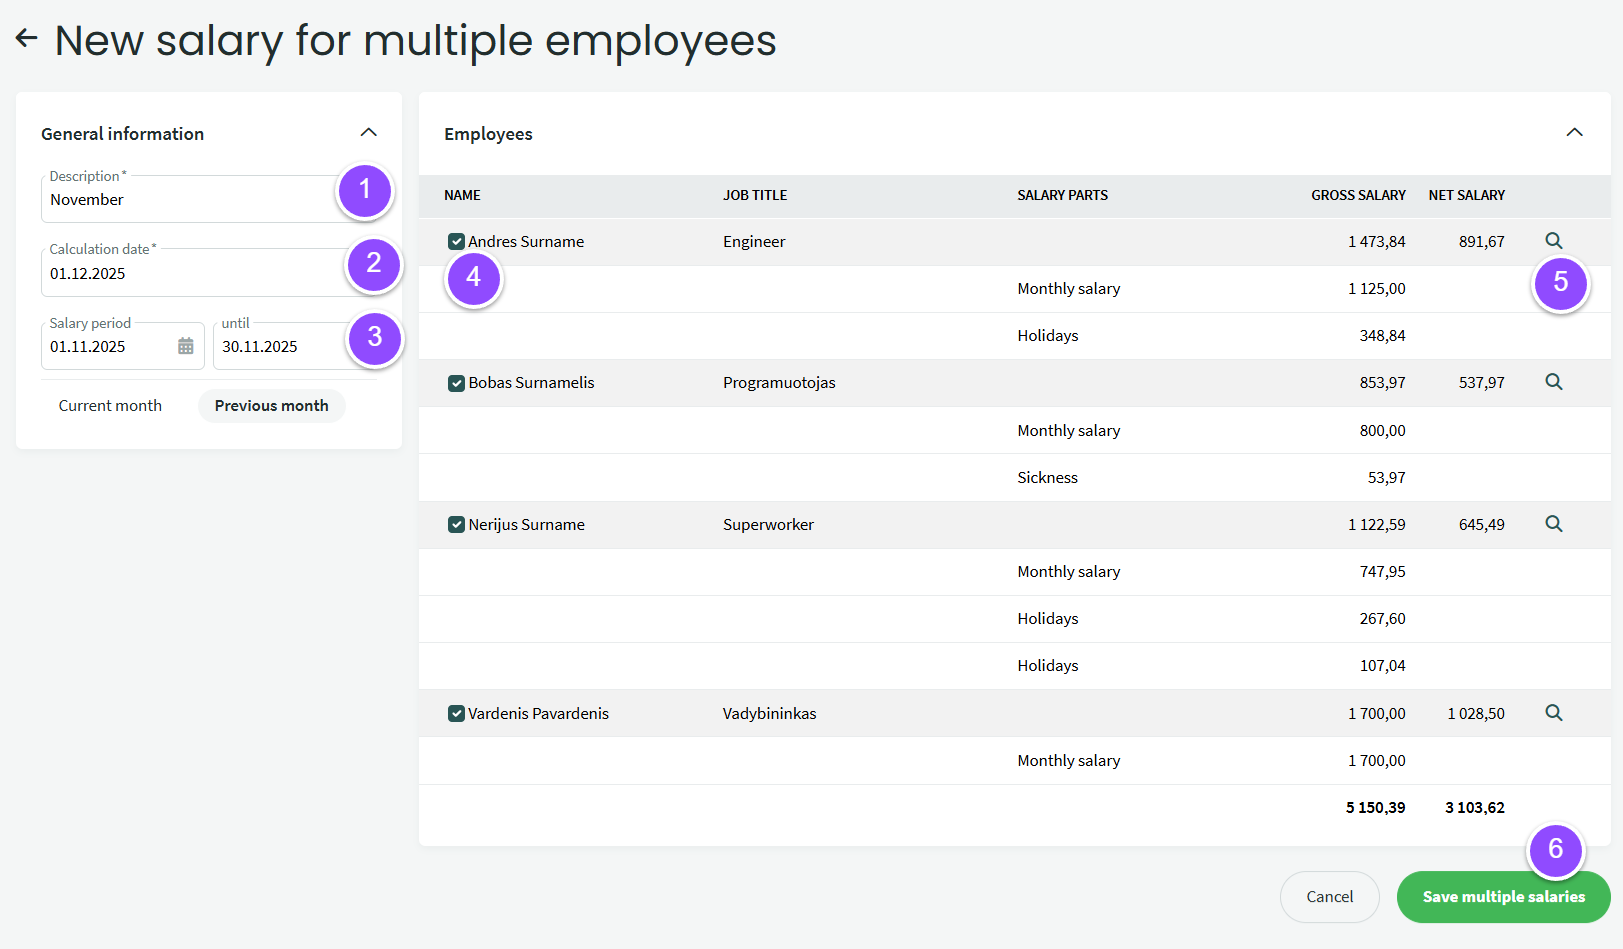
1. Enter the name of the calculation, for example the name of the month.
2. If you are calculating for a full month, select the last day of that month.
3. Select the payroll calculation period (or click one of the options below – Current month or Previous month – which will automatically fill in the date fields).
4. On the right side, you can uncheck boxes if you do not want the selected employee’s salary to be calculated.
5. Click the magnifying glass icon if you want to view/edit the selected employee’s salary in a new window.
6. Save the settings.
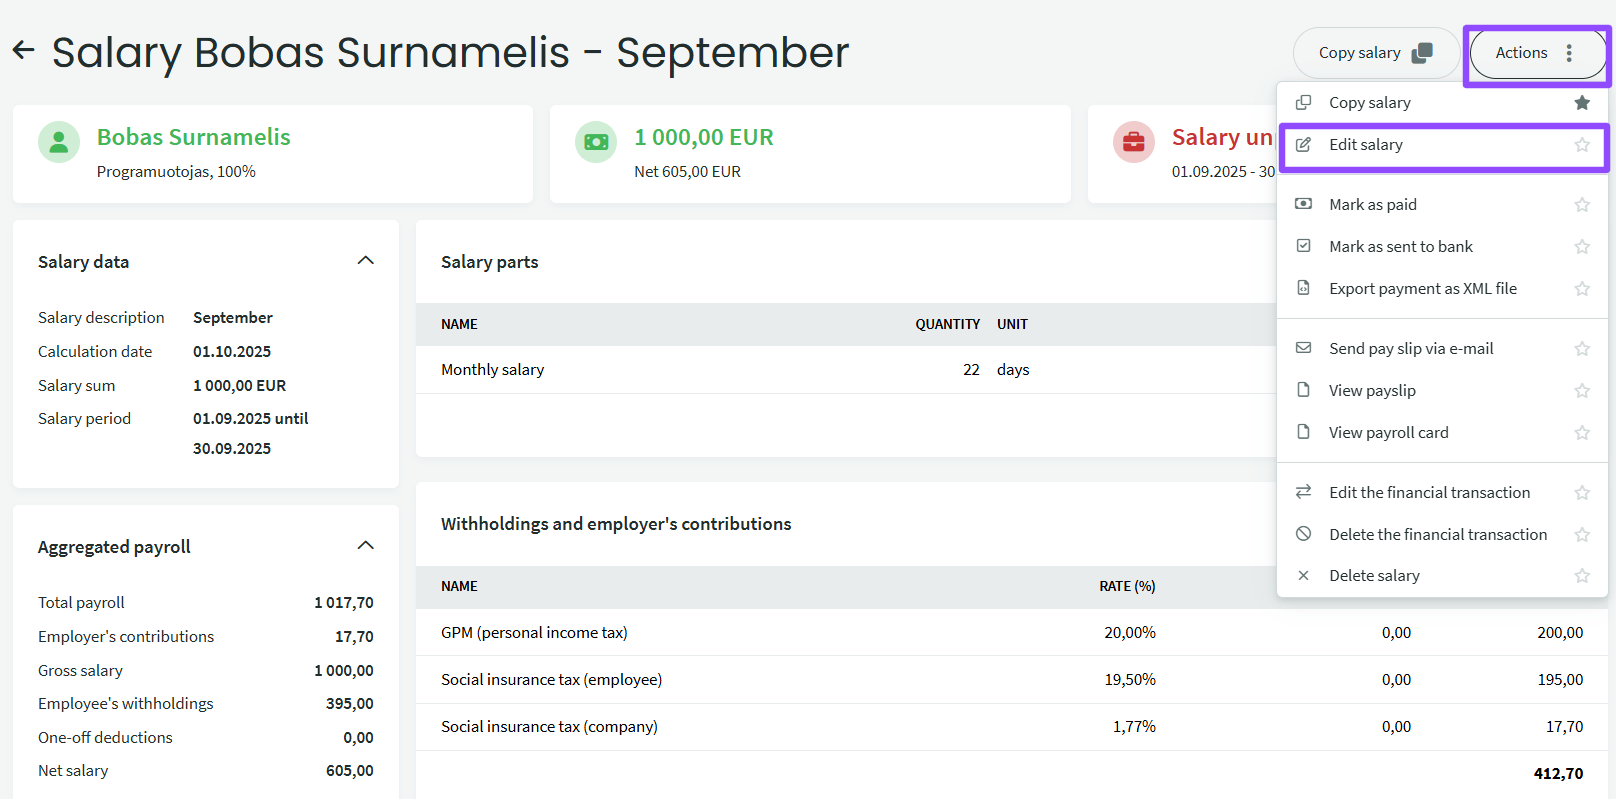
After entering the calculations, you will be redirected to the Payroll window, where the calculated salaries will be displayed. By clicking on the desired salary, you can review the calculations in more detail. If you want to edit the salary, you can select “Edit salary” at the top right or perform other actions, such as paying the salary.
● Payments. Menu Payroll – Payments.
To record a salary payment, click +New payment. In the window that opens:
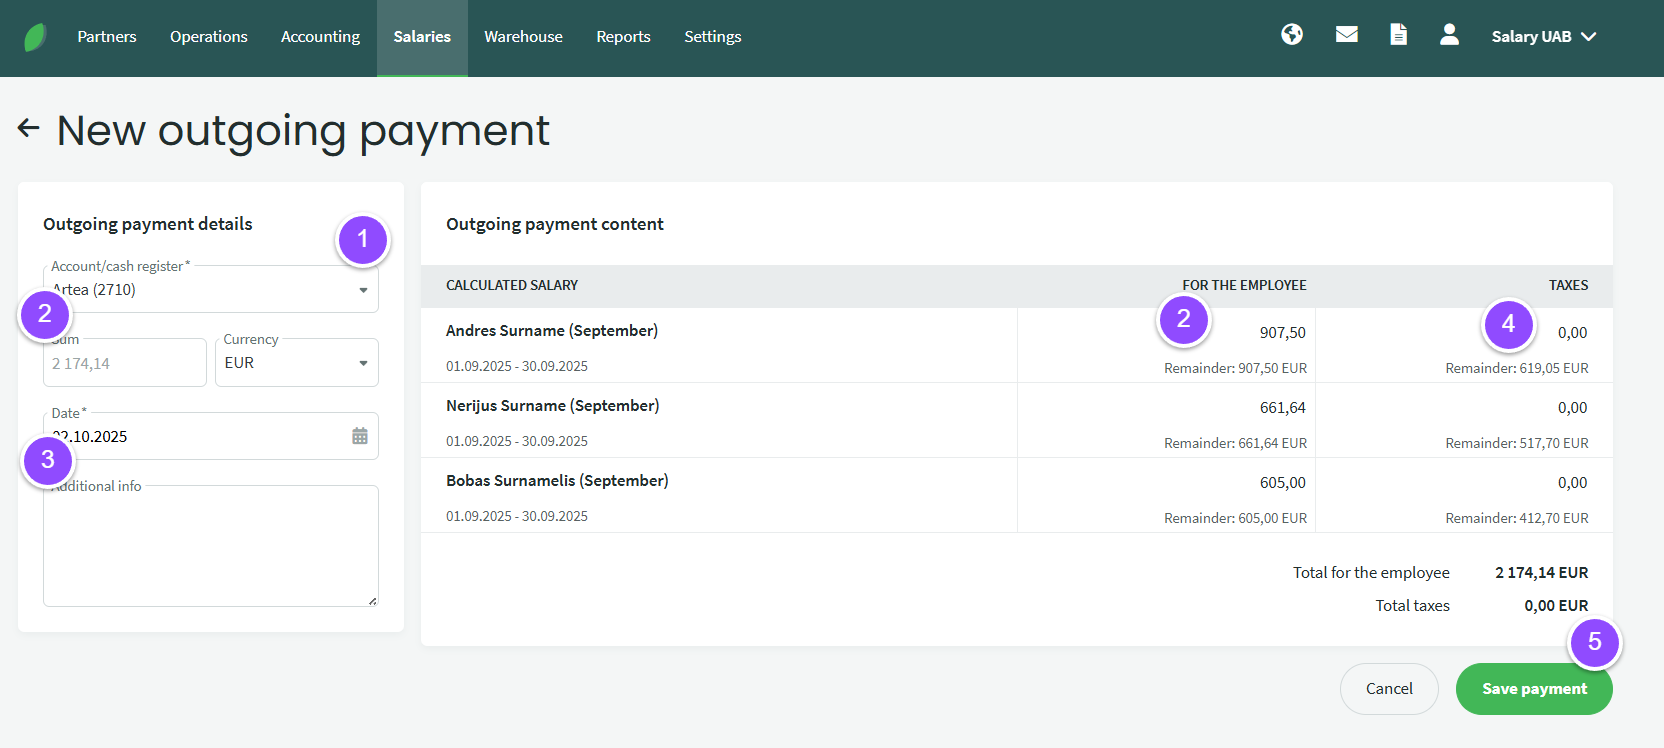
- Select the bank account for the payment
- Amount. If needed, you can adjust the amount for each employee individually (on the right side)
- Set the payment date
- You can also indicate tax payments at the same time, but we recommend entering this amount as a separate payment.
- Save the data
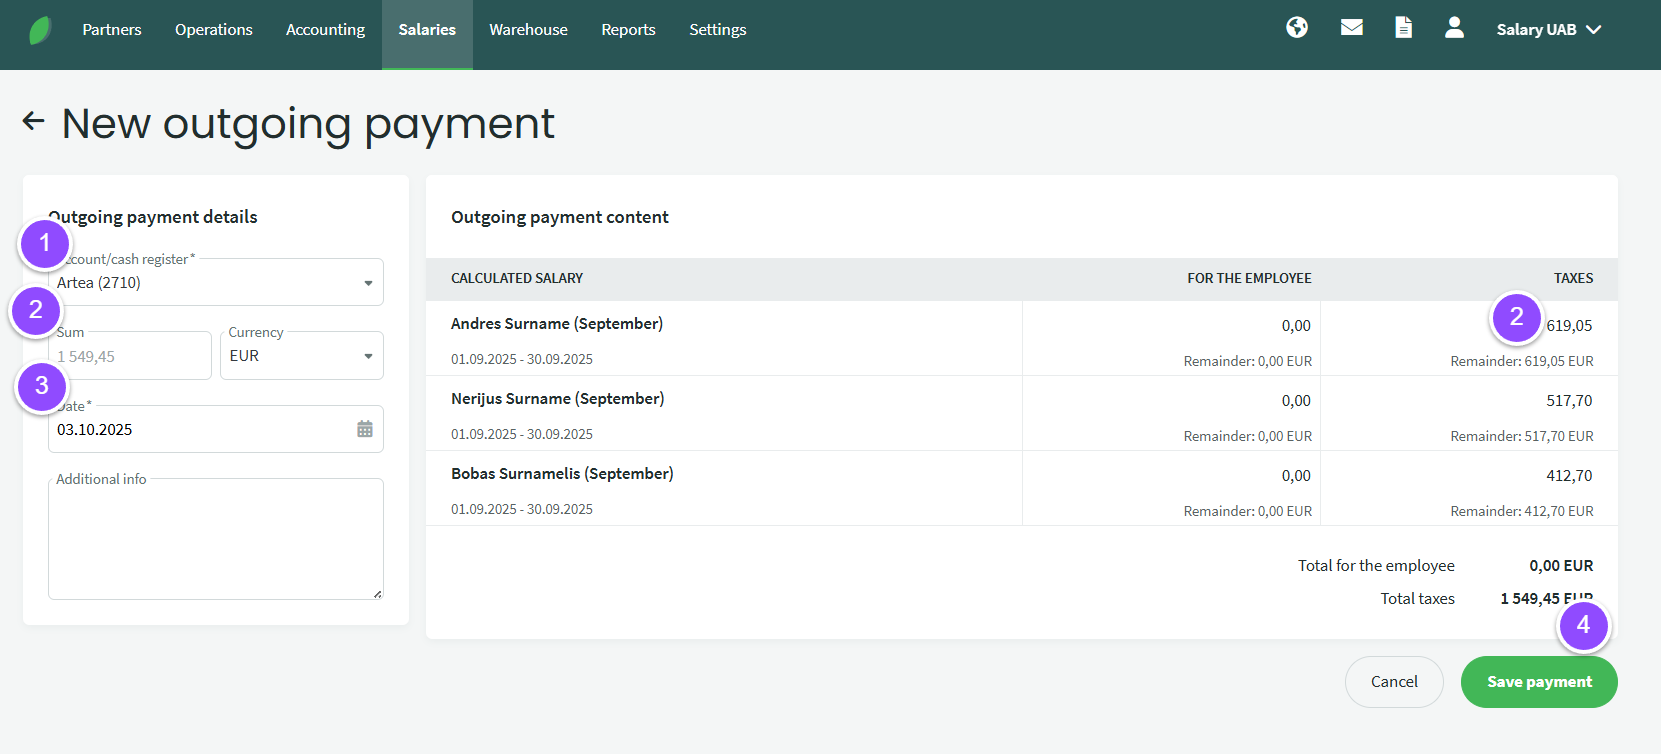
If salaries were previously paid out, the system will automatically fill in the Tax fields.
- Select the bank account for the payment
- Amount. If needed, you can adjust the amount for each employee individually (on the right side).
- Set the payment date
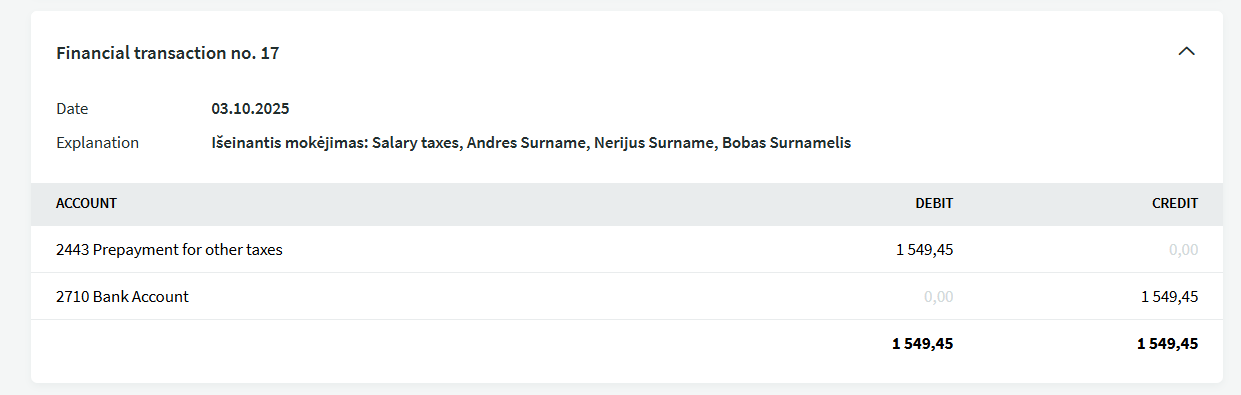
- Save the data. After saving, a window with the payment details will open.
If you have any questions, write to us at support@simplbooks.lt

Leave A Comment?