
This guide provides basic settings of the sales invoice.
Reminder IF Entering initial balances has not been saved, no accounting entries are made in the accounts ● Before entering your first sales invoice, you should think about the format of the invoice numbers. By default, the number formula is set to the number of years + 3 digits (3N). Also consider using a reference number as this makes it easier to link receipts and invoices when importing the bank.The invoice number formula and reference number can be set in Settings -> Environment Settings -> Invoice Settings. ● While you’re in the invoice settings, it’s a good idea to review the invoice templates as well. Choose a preferred one from the existing templates or create a new one in Settings -> Environment Settings -> Invoice Settings.
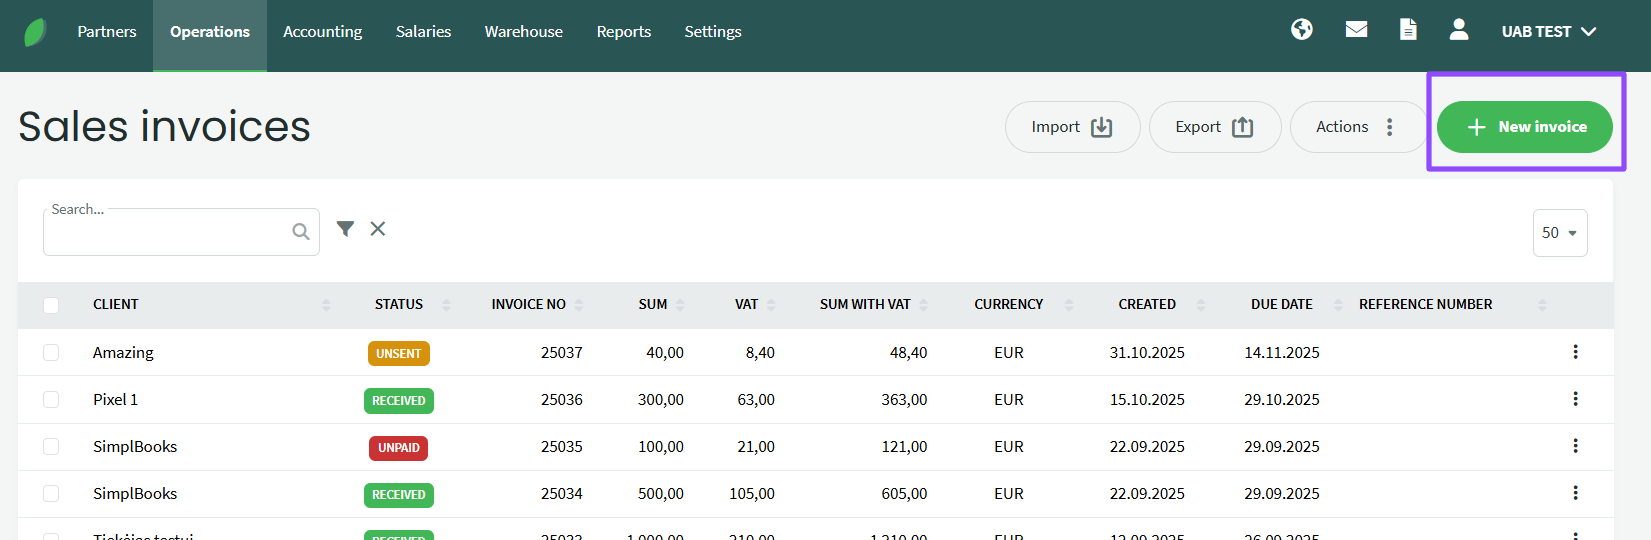
● To enter a new sales invoice, go to Operations -> Sales invoices -> New invoice
● Below, we’ll take a closer look at the different panels and configuration options. Click on a topic to read more detailed information.
This setting is user-specific, allowing each user to customize the visible fields according to their needs.
In the top right corner of the invoice panels, there is a gear icon. Clicking on it will open the configuration view. First, you can choose whether the data is displayed in one or two columns (the default is two).
If you select the single-column view the “Invoice details” panel will move up, and the panel “Additional invoice details” – will move down.
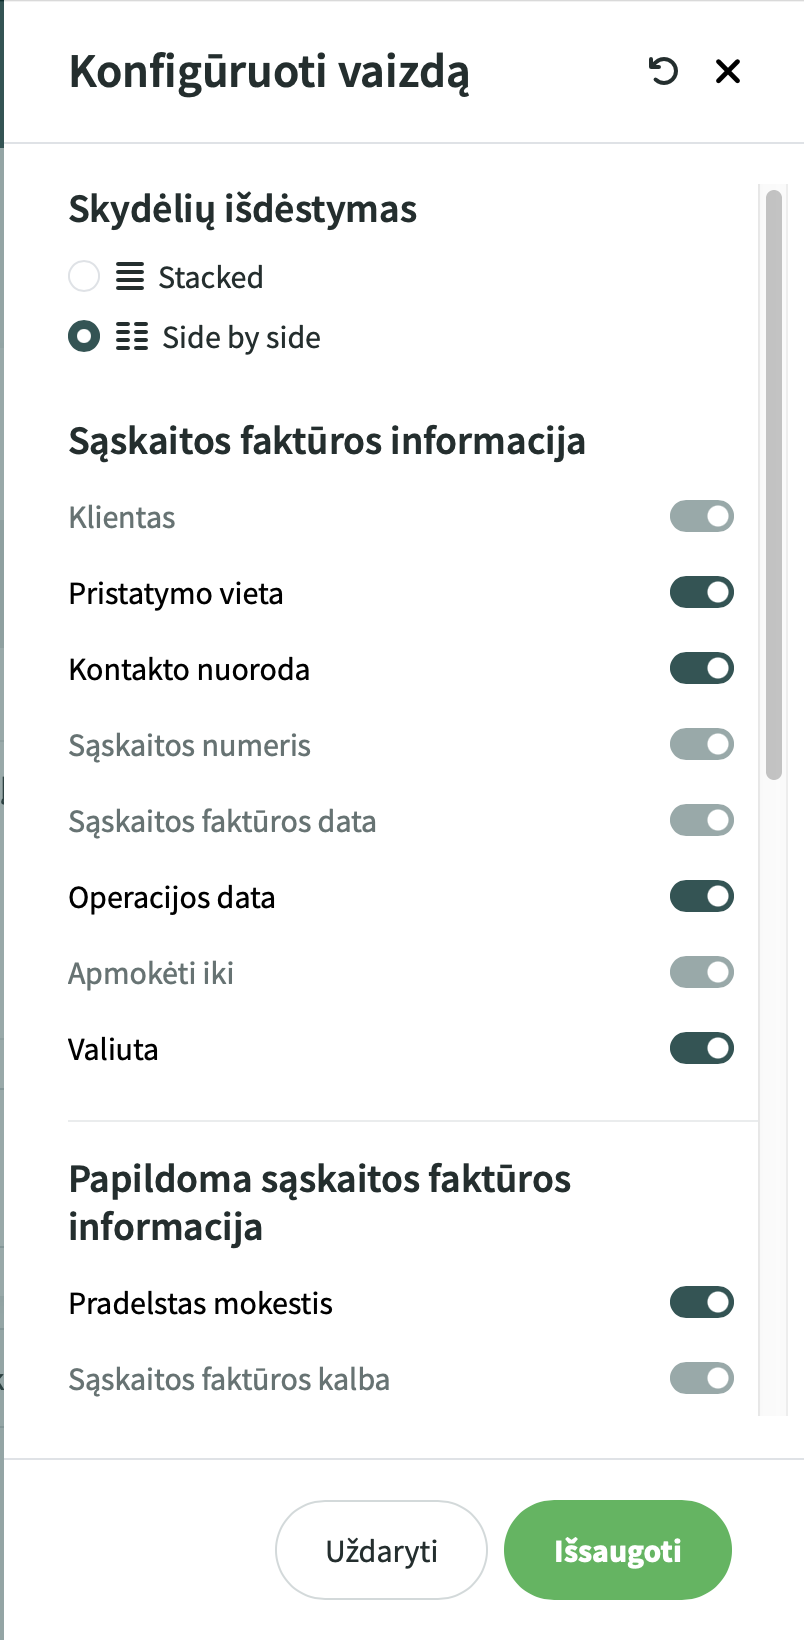
The further options are divided by invoice panels. Some fields are set as mandatory and cannot be hidden. If you disable certain fields, they will not be shown in the invoice entry view. If needed, you can reactivate them later.
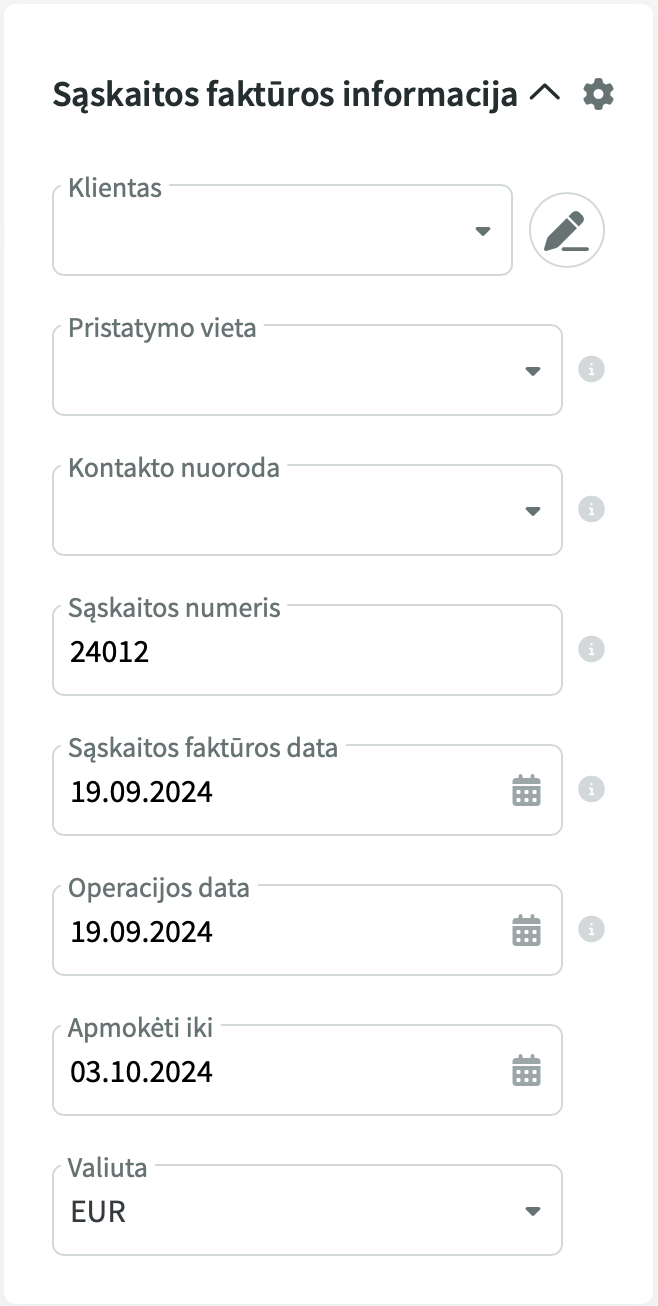
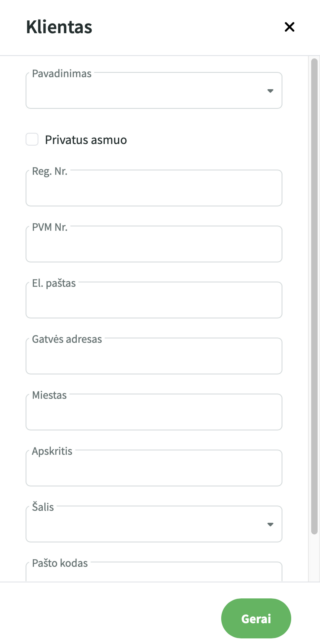
- Client – select from existing customers or add a new one
- The pencil icon allows you to edit customer details.
- Delivery Location – equired if the shipping address is different from the company’s legal address (for example: store locations for retail chains). Add the delivery address beforehand in Partners-> Delivery addresses
- Contact Reference – contact person details can be saved in advance in Partners -> Cantacts. If the contact person’s information does not need to be stored long-term, you can enter it here (it will not be saved to the database).
- Invoice number – the system will suggest the next number based on the configured formula. If you manually change the invoice number and save the invoice, the formula will be “broken” and the next invoice number will not be suggested correctly. Do not change the invoice number without a valid reason!
- Invoice date – by default, this is set to the date when the invoice is entered into the system. It can be changed if needed.
- Transaction date – by default, this is the same as the invoice date. If you create invoices at the beginning of the next month for services provided in the previous month, the transaction date can be changed to ensure that the income is recorded in the correct period (for example: for services provided in June, the invoice is issued at the beginning of July. The invoice date is July 3rd and the transaction date is selected as June 30th)
- Payment due date – automatically set based on the invoice date. By default, it is 14 days in the settings, but it can also be set individually for each customer (Partners -> Customers and suppliers, client card).
- Currency – Invoices can be created in currencies other than the euro. The exchange rate is loaded from the European Central Bank’s database. The required currency must first be activated under Settings–> Currencies.

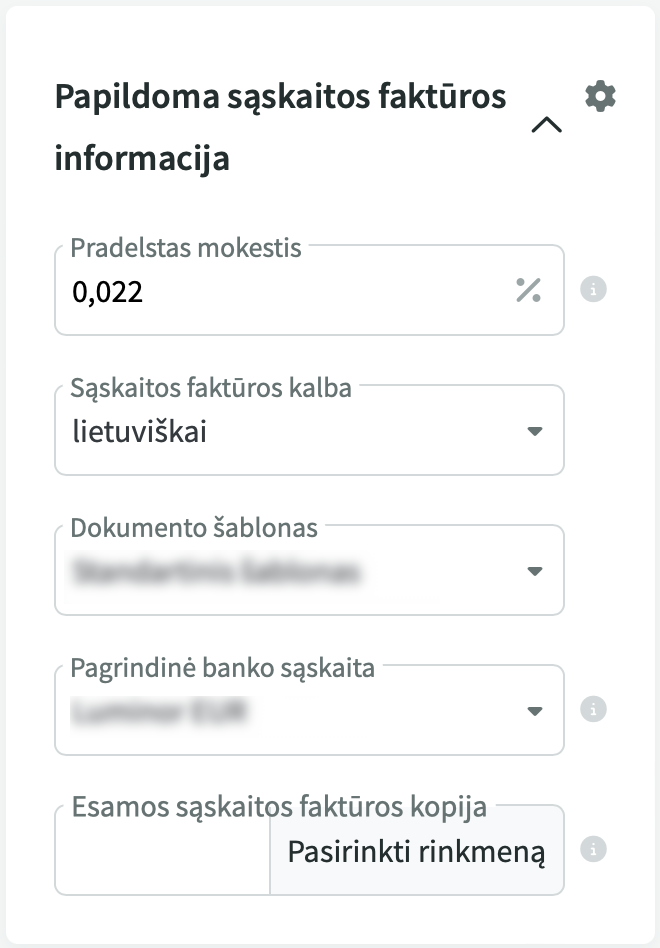
- Overdue charge – adjustable, the default charge can be modified under environment settings or on the client card
- Invoice language – determines the language in which data will be displayed on the invoice PDF. The available language options can be found in the invoice settings under environment settings. Default invoice template data, which the user cannot modify, is automatically translated. Any text added by the user must be translated manually.
- Document template – the default invoice template is defined in the settings. If needed, you can change the template used for this specific invoice here.
- Copy of existing invoice – If the invoice has been created outside the system and you want to keep a copy, you can upload it here. In this case, the system will not generate its own PDF file. The file size limit for a sales invoice is 200 KB. In general, we recommend using this option only if you have migrated from another software and are uploading invoices previously sent to customers..
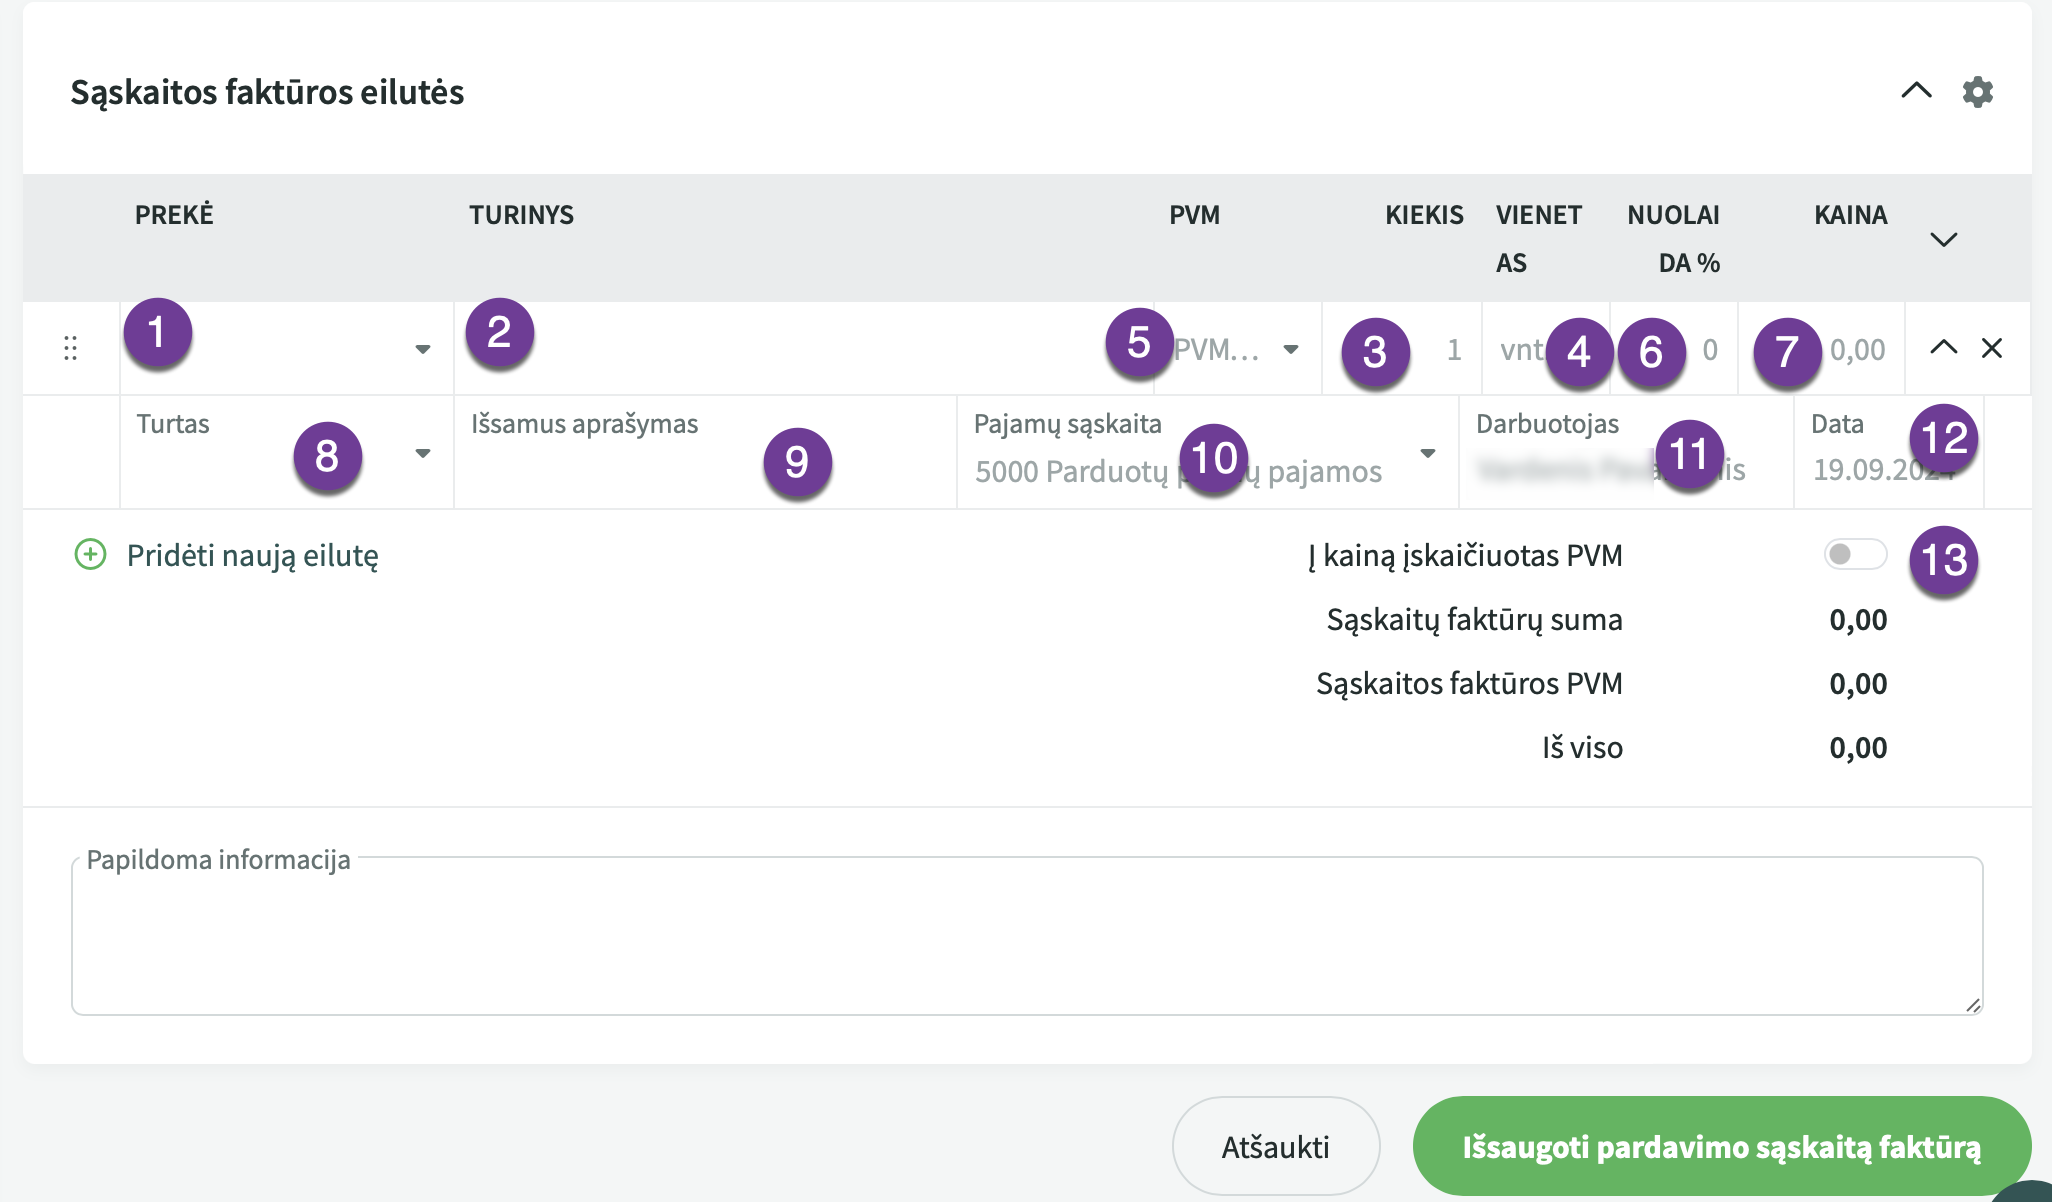
- Article – Optional field, mainly needed when selling warehouse items.
- Contents – description of the sold goods or services, mandatory field. To be filled in manually or based on the item card information.
- Quantity – quantity of sold goods/services.
- Unit – if using an item, the quantity is taken from the item card. Otherwise, it must be entered manually. By default, the unit is set to “pcs” (pieces).
- VAT – VAT type (affects the income account)
- Dis% % – discount percentage
- Price – price per single unit
- Asset – for the sale of a fixed asset, select the asset name here to ensure that the asset write-off happens automatically. Based on this, the appropriate income account will also be selected.
- Detailed description – additional information that can be recorded on the invoice line
- Income account –automatically determined based on the VAT type. If you need to change the income account, modify the VAT type. The VAT statement will consider the data from both the income account and the VAT type!
- Employee – by default, the name entered on the invoice is displayed here.
- Date – default invoice entry date, which can be changed and if needed, added to the invoice template.
- Price includes VAT – determines whether the price specified on the invoice lines includes VAT or not.
The default text for the additional info field is loaded from the invoice settings (Environment settings -> Invoice settings). You can also add any additional information here that is needed for the customer.
If you have any additional questions, please write to us at support@simplbooks.lt

Leave A Comment?